 So I've decided that in addition to reviewing some nice mangas, I'll also start giving out some drawing tips. We'll start with the eyes today. As we all know, the eyes are the most distinguishing feature of anime characters. So to be succesful as a manga artist, you need to be able to define your individual characters, give them expression and personality. The eyes are the most reasonable place to start you on your career.
 Lets begin with the most basic and common of anime eyes, the large female type. Start off by drawing a line that curves upwards, and is slightly thicker at the highest point. This eye will be on the right side of the face, so make the left end of the curved line higher than the right. The top of this particular eye (Lina Inverse's eye, actually) isn't a perfect curve; it is slightly angular. Some styles of eyes are nearly perfectly curved on
 the top.
 Next, you want to draw in the lower part of the eye. To help you place the lower half, lightly draw diagonal lines pointing down, starting at the edges of the top part of the eye. The steepness of the slope of these lines will determine how large and wide the eye will be. If you look at the other tutorials on this page, you will see that the steepness of these lines varies. Using these lines as a guide, draw the lower part of the eye. It should slope down to the right a little, and should be thicker at the right corner.
 Erase the guidelines and draw a long oval within the eye. Some characters have large circles for irises, but this particular one has thin ovals. You can adjust the shape so it's wider, if you like. Make part of the oval obscured by the upper part of her eye. With all styles, the complete iris is rarely visible; part of it almost always is concealed by the border of the eye.
 Next, draw the outline of the light glares. Anime characters' eyes should always have at least some sort of shading. Anime females in particular tend to have really heavy shading and lots of shiny areas. Make sure you choose a light source, and stick with it throughout your picture. For example, since the light is coming from the left in this picture, I have to make sure all the highlights on the rest of the picture originate from the left, or the lighting will be inconsistent (unless I'm using multiple light sources, but I won't get into that). Draw two long ovals: a large one on the left side of the iris (which overlaps the outline of the iris, as you can see), and a very small one on the other side of the eye.
 Next, draw the pupil underneath the light glares. The highlights are always on top; never draw the pupil on top of the light glares. Draw the eyelashes, too; with this particular eye, the eyelashes are a series of spikes coming off of the top-right part of the eye. Make the spikes follow the curve of the eye, so it looks like they are coming off of the eye; don't just draw zig-zag lines sticking out of her eye. ^_~ Also, draw the eyelid on the left part of the eye. Its just a thin, curved line originating from the top of her eye.
 And there you have it ^.^, you've survived drawing your first manga eye. Obviously with more practice you'll become better at it.
 Okay, now we are going to draw another style, one that isn't as common. This eye is much more slender, elegant, and realistic looking, and is used in more serious anime and manga. Begin by drawing a long, slightly curved line. The left side should be lower than the right, and the line should curve in sharply at the left edge.
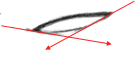 To help you define the sides and bottom of the eye, lightly draw two diagonal guidelines that originate from the edges of the eye. Unlike the previous tutorial, these lines are not very steep; the more horizontal the lines are, the smaller the eye will be. Don't make them too flat, though, because you don't want this eye to be too squinty. Using the guidelines, draw the bottom line of the eye.
 Erase the guidelines and draw the outline of the iris. If there were no eyelids, the iris would be a perfect circle. However, since the iris is bordered by the eyelids, the top and bottom of the iris will be hidden from view. The iris should not be so small that you can see the entire thing (unless you wanted to convey certain emotions like anger or surprise, but that is covered in another section).
 Next, draw the light glares on the iris. The placement is the same as in the previous tutorial, but like the iris itself, the glares are much smaller and more circular. Draw the eyelid above the top line of the eye, as well.
 Draw the eyebrow and shading in the rest of the iris. Remember to draw the pupil beneath the light glares, and to make it stand out from the rest of the eye a little no matter how darkly you shade the rest of the iris.
 Here are a variety of other styles of female eyes you can make using the same methods. Try to see the differences between each style, as well as the similarities. Though the shape and proportions change, the top border of the eyes is always thicker, there are always multiple layers of shading on the irises, etc. Some of these were sketched fairly quickly and are a little messy, but I hope they are still helpful.
We'll do the male eyes tomorrow. See you then^^.
No comments:
Post a Comment